Cache Clearing: What, Why, When, & How?
Have you ever been told to “clear your cache” when experiencing website problems? This is commonly the first piece of advice given to people who come across issues related to how a webpage should look versus what they’re actually seeing.
While simply “clearing your cache” in these instances is often the exact solution to your problem, it may not be a very helpful recommendation if you don’t know what the cache is, why and when you should clear it, and how to properly do so.
Fortunately, Rosemont Media is here to help! Below is a complete guide to the what, why, when, and how of cache-clearing. We hope these tips will help you learn about the role of the cache and effectively resolve any related webpage problems.
What Is the Cache?
In short, the cache is an automatically updated memory bank on your hard drive that hosts downloaded information from websites you visit. Specific browsers (e.g. Firefox, Google Chrome, Safari, etc.) maintain their own cache databases, which exist to eliminate the need to re-download every element of a website upon each return visit.
To illustrate the cache in action, let’s say you’re interested in porcelain veneers and you visit a local dentist’s website using the Chrome browser. Since this is your first time to the site, Chrome will need to download several page elements – such as logos, pictures, and even page formatting – as it opens the veneers webpage to display it properly on your screen. Unbeknownst to you, these downloaded features are then saved in your cache to be reused whenever and wherever applicable, as opposed to making Chrome re-download them every time the same elements appear on the site. These saved features will then be used again – even if you leave the site and return at a later time.
Why Clear My Cache?
So if storing downloaded page elements is a good thing, why would you ever want to clear your cache and lose all of that information? Unfortunately, like many things in life, the cache doesn’t always behave as it is designed to.
For example, you may have recently updated the design of a certain page on your own website, but when you go to the page, the old layout is displayed. This is likely because an outdated – or “cached” – version of the webpage is being accessed by your browser. Alternatively, the page may appear warped or strange-looking, or you might even encounter an error message.
Another example: you’ve started to notice a lot of “lag” (or slow performance) on your computer, and it’s making the process of navigating the internet needlessly difficult. In fact, it’s so slow that it’s ruining your entire experience and tempting you to just log off altogether. It’s possible that the lag is occurring because the browser’s cache is too full.
All of these are normal issues that are rarely cause for alarm, and can usually be fixed with a good cache-clearing. If you were to clear your cache and revisit the page, your browser would download all elements anew as if you had never been to the site before, effectively loading and displaying the most current (and correct) version of your webpage.
When Should I Clear My Cache?
The cache isn’t necessarily something you need to remember to clear on a set schedule, but rather something you should clear when you notice a page displaying incorrectly. Some of the most common indications that a cache clear may be in order include:
- New updates or changes to a webpage are not displaying
- A page only loads partially
- The webpage is badly formatted
- Incomplete (or even incorrect) images are being displayed
- Things are loading or running uncharacteristically slowly
When Should I Do a Hard Reload?
Before going through the steps of complete cache-clearing, we recommend performing a “hard reload” of the page in question to first see if doing so resolves any issues you are experiencing.
If you are on a Mac, a hard reload can be done by accessing the page in question and simultaneously pressing Command + Shift + R. For Windows, pressing Control + Shift + R at the same time while on the page will perform a hard reload.
If a hard reload doesn’t work, you will likely need to do a full cache clear.
How Do I Clear My Cache?
Below, you will find cache-clearing instructions for three popular browsers: Firefox, Chrome, and Safari.
While simply “clearing your cache” in these instances is often the exact solution to your problem, it may not be a very helpful recommendation if you don’t know what the cache is, why and when you should clear it, and how to properly do so.
Fortunately, Rosemont Media is here to help! Below is a complete guide to the what, why, when, and how of cache clearing—allowing you to effectively resolve a number of webpage problems you might encounter from time to time.
What Is the Cache?
In short, the cache is an automatically updated memory bank on your hard drive that hosts downloaded information from websites you visit using specific browsers (e.g. Firefox, Google Chrome, Safari, etc.). Its purpose is to eliminate the need to re-download every element of a website upon each return visit, creating a quicker, more seamless browsing experience.
To illustrate the cache in action, let’s say you’re interested in porcelain veneers and you visit a local dentist’s website using the Chrome browser. Since this is your first time to the site, Chrome will need to download several page elements—such as logos, pictures, and even page formatting—as it opens the veneers webpage to display it properly on your screen. Unbeknownst to you, these downloaded features are then saved in your cache to be reused whenever and wherever applicable, as opposed to making Chrome re-download them every time the same elements appear on the site. These saved features will then be used again even if you leave the site and return at a later time or date.
Why Clear My Cache?
So if storing downloaded page elements is a good thing, why would you ever want to clear your cache and lose all of that information? Unfortunately, like many things in life, the cache doesn’t always behave as it is designed to. For example, you may have recently updated the design of a certain page on your own website, but when you go to the page, the old layout is displayed. This is likely because an outdated—or “cached”—version of the webpage is being accessed by your browser. If you were to clear your cache and revisit your page, your browser would download all elements anew as if you had never been to the site before, effectively loading and displaying the most current (and correct) version of your webpage.
When Should I Clear My Cache?
The cache isn’t necessarily something you need to remember to clear on a set schedule, but rather something you should clear when you notice a page displaying incorrectly. Some of the most common indications that a cache clear may be in order include:
- New updates or changes to a webpage are not displaying
- A page that only loads partially
- A badly formatted webpage
- Incomplete—or even incorrect—images
How Do I Clear My Cache?
Before going through the steps of complete cache clearing, we recommend performing a “hard reload” of the page in question to first see if doing so resolves any issues you are experiencing.
If you are on a Mac, a hard reload can be done by accessing the page in question and simultaneously pressing Command + Shift + R. For Windows, pressing Control + Shift + R at the same time while on the page will perform a hard reload.
If a hard reload doesn’t work, you will likely need to do a full cache clear. Below you will find cache clearing instructions for three popular browsers: Firefox, Chrome, and Safari.
Cache Clearing on Firefox
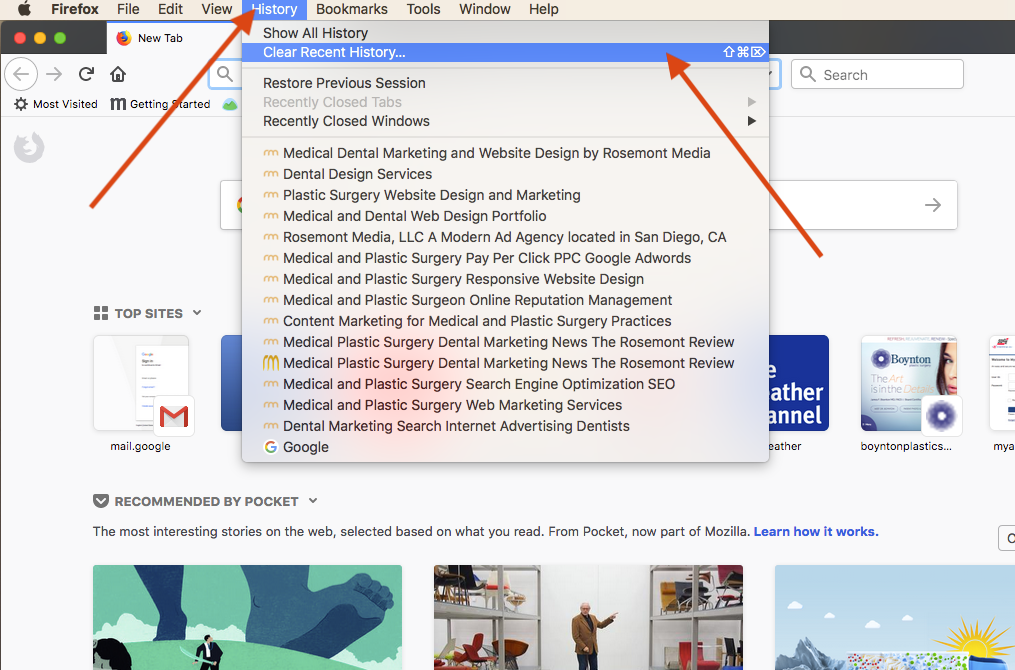
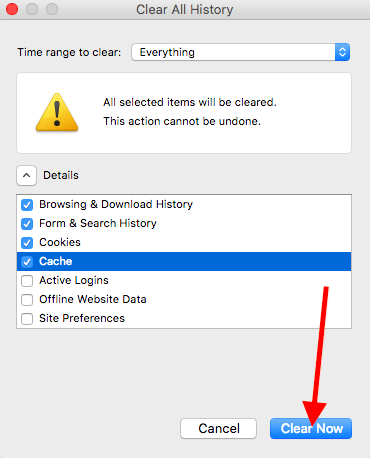
1. Click on “History” in the menu bar at the top of your computer screen and select the “Clear Recent History…” option in the dropdown
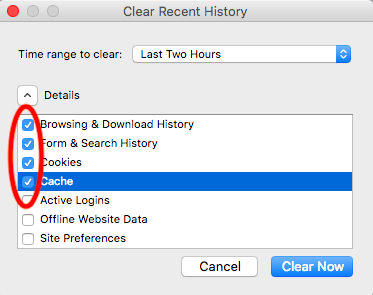
2. Click the down arrow beside “Details” and make sure the following are checked:
a. Browsing & Download History (optional)
b. Form & Search History
c. Cookies
d. Cache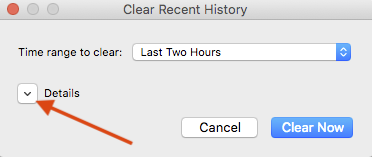
3. Click the dropdown menu next to “Time range to clear:” and select “Everything”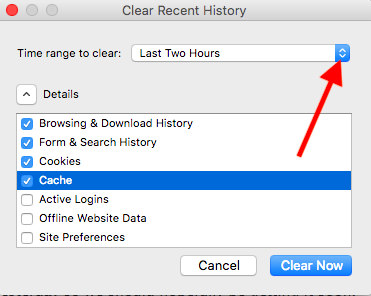
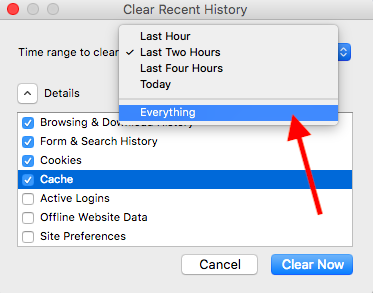
4. Click “Clear Now”
Cache Clearing on Chrome
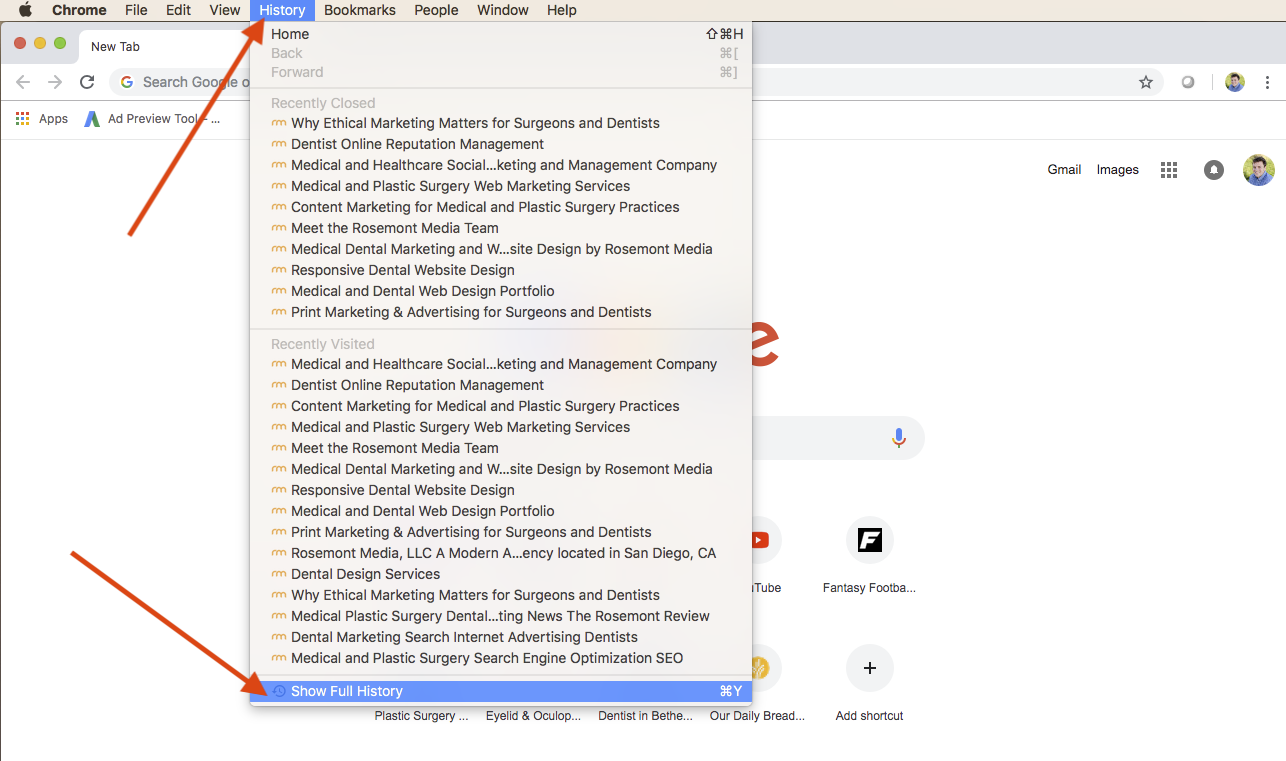
1. Click on “History” in the menu bar at the top of your computer screen and select the “Show Full History” option at the bottom of the dropdown
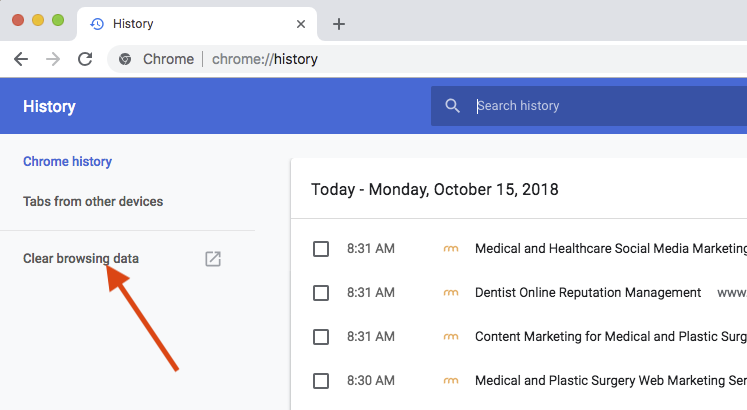
2. On the left sidebar, click “Clear browsing data”
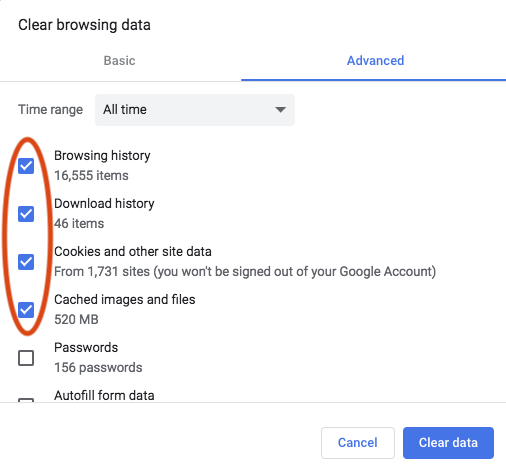
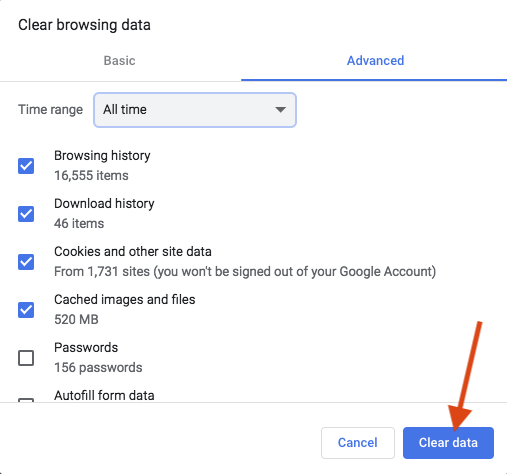
3. Make sure “All Time” is selected in the dropdown menu next to “Time range”
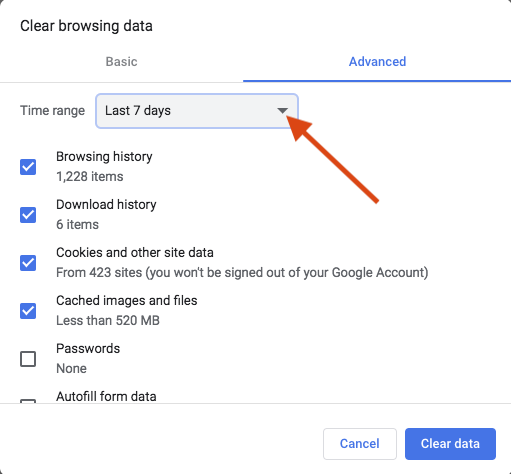
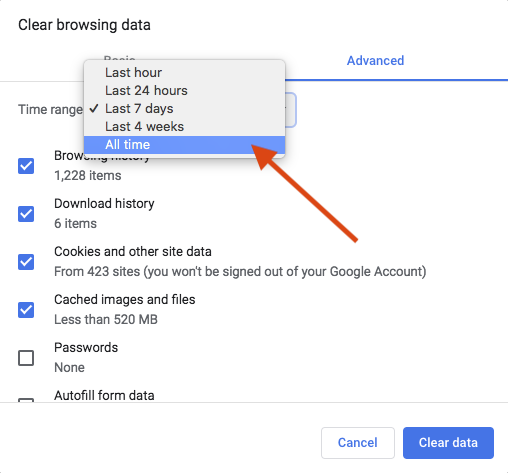
4. Make sure the following are checked:
a. Browsing history (optional)
b. Download history
c. Cookies and other site data
d. Cached images and files
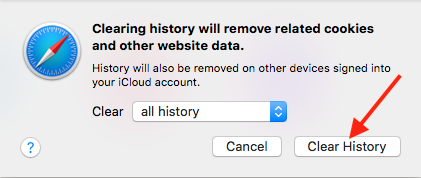
Cache Clearing on Safari
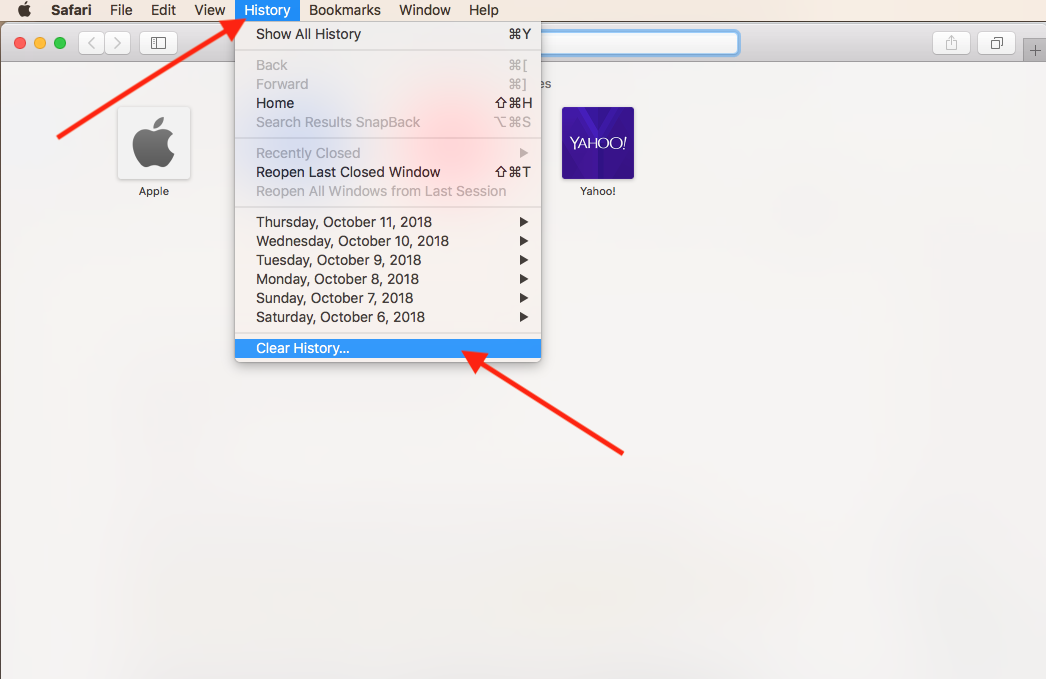
1. Click on “History” in the menu bar at the top of your computer screen and select the “Clear History…” option at the bottom of the dropdown
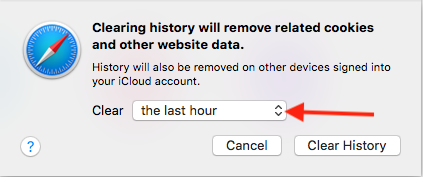
2. Click the dropdown menu next to “Clear” and select “all history”
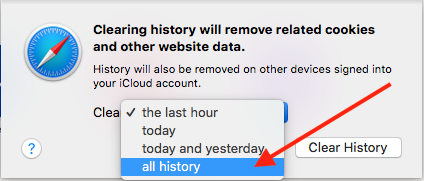
3. Click “Clear History”
Cache Clearing Not Working?
If you’ve followed the steps above and are still experiencing issues, don’t fret! Just give us a call and a member of our team will be happy to assist you in troubleshooting the problem and finding the appropriate solution.
Editor’s note: The original version of this post was published on October 16, 2018.
